Soul Shoppe's work is made possible by donors and partners who care deeply about the young people in their communities! We can't do this work without you. Support our work in classrooms and on playgrounds across the nation by donating here.
In a world of constant digital distraction, teaching children how to truly listen is more critical than ever. Active listening is not just about hearing words; it’s a foundational social-emotional skill that builds empathy, strengthens relationships, and creates psychologically safe classrooms and homes. For parents and teachers, fostering this ability is key to helping students navigate conflicts, build connections, and thrive. This is a skill that directly impacts a child’s ability to learn, collaborate, and show respect for others.
This article moves beyond generic advice, providing a curated collection of eight practical, research-backed active listening activity ideas. Each activity includes step-by-step instructions, grade-level adaptations, and real-world examples designed for immediate use in K–8 classrooms and family settings. We will cover a range of techniques, from simple paraphrasing and the use of silence to more structured protocols like Empathy Mapping and Active Listening Circles.
You will learn how to guide students in understanding another’s perspective, asking meaningful questions, and recognizing the importance of non-verbal cues. To truly understand the impact and application of active listening, exploring concrete examples can be incredibly insightful, such as these 8 Powerful Active Listening Examples. The exercises in this guide are simple yet powerful, helping you cultivate a culture of deep, meaningful understanding. Whether you’re a principal, teacher, counselor, or parent, these strategies offer actionable ways to make genuine listening a core part of your environment.
1. Reflective Listening (Paraphrasing)
Reflective listening is a foundational active listening activity where the listener rephrases the speaker’s message in their own words. This simple but powerful technique serves two key purposes: it confirms understanding and shows the speaker that their thoughts and feelings are being heard and valued. Instead of immediately judging or problem-solving, the listener acts as a mirror, reflecting the core message back to ensure clarity and connection.
This method, with roots in the work of psychologist Carl Rogers, builds a feedback loop that reduces miscommunication and validates the speaker’s experience. It is a cornerstone of Social and Emotional Learning (SEL) because it builds empathy, strengthens relationships, and gives students a concrete tool for conflict resolution.
How to Use Reflective Listening
Begin by listening intently not just to the words, but to the emotions and underlying needs being expressed. Once the speaker pauses, paraphrase what you heard using your own words.
Key Insight: The goal is not to repeat like a parrot but to capture the essence of the message. Using starter phrases like, “So, what I’m hearing is…” or “It sounds like you’re feeling…” can help frame your reflection naturally.
Classroom Example:
Student: “I hate group projects! Maya never does any work, and I have to do everything myself. It’s not fair.”
Teacher: “It sounds like you’re feeling really frustrated and overwhelmed because you believe the workload in your group isn’t being shared equally.”
Home Example:
Child: “I don’t want to go to soccer practice anymore. Everyone is better than me.”
Parent: “So, you’re feeling discouraged about soccer right now and worried that you can’t keep up with your teammates. Is that right?”
Tips for Effective Implementation
To make reflective listening a successful active listening activity, focus on these practical steps:
Focus on Emotion and Need: Listen for the feelings behind the facts. Reflecting the emotion (“you’re feeling disappointed”) is often more connecting than just repeating the situation.
Pause Before Responding: Take a breath (3-5 seconds) after the speaker finishes. This prevents reactive replies and shows you are thoughtfully considering their words.
Use Natural Language: Avoid sounding robotic. Your reflection should sound like you, not like you’re reading from a script.
Ask for Confirmation: End your reflection with a gentle question like, “Did I get that right?” or “Is that how you’re feeling?” This gives the speaker a chance to clarify their message and feel truly understood.
2. Silent Listening (The Pause Technique)
Silent listening is an active listening activity centered on maintaining quiet, focused attention without planning a response while someone speaks. This approach highlights the power of silence, giving speakers the space to fully express themselves without interruption. It recognizes that meaningful pauses allow for deeper thought and emotional processing, which is especially important for students who need more time to formulate ideas or navigate their feelings.
This technique, supported by research from educators like Mary Budd Rowe on “wait time,” shows that even a few seconds of silence can dramatically improve the depth and quality of communication. By resisting the urge to immediately fill the quiet, a listener demonstrates respect and patience. This practice is a key part of Social and Emotional Learning (SEL), as it builds a safe environment for vulnerability, encourages thoughtful reflection, and shows students that their voices are important enough to be given space.
How to Use Silent Listening
Start by dedicating your full attention to the speaker, focusing on their words, tone, and body language. When they pause or finish speaking, intentionally wait for a few seconds before you say anything. This quiet moment is the core of the activity, allowing the speaker’s message to land and giving them a chance to add more if they need to.
Key Insight: Silence isn’t empty; it’s an active space for thinking and feeling. By normalizing the pause, you teach students that reflection is just as important as speaking, reducing anxiety and encouraging more thoughtful participation.
Classroom Example:
Teacher: (After asking a complex question) “What are some reasons why the main character might have made that choice?” (The teacher then waits silently for 5-7 seconds, making eye contact with the class.)
Student: (After a long pause) “Well… at first I thought she was just being mean, but now I think maybe she was scared. She mentioned earlier that she didn’t want to be left alone.”
Home Example:
Child: “I got in an argument with Sam today at recess.” (The child stops, looking down.)
Parent: (Instead of immediately asking “What happened?” or “What did you do?”, the parent waits quietly, maintaining a caring expression.)
Child: (After a moment of silence) “…He said I couldn’t play with them anymore. It really hurt my feelings.”
Tips for Effective Implementation
To make silent listening a successful active listening activity, concentrate on these practical steps:
Resist the Urge to Interject: Train yourself to be comfortable with silence. The primary goal is to let the speaker complete their entire thought, which may include several natural pauses.
Use Open Body Language: While you are silent, show you are still engaged. Maintain gentle eye contact, nod occasionally, and keep your posture open and receptive.
Practice Intentional Wait Time: After you or a student asks a question, count to at least 3-5 seconds before allowing anyone to answer. This simple habit improves response quality.
Explain the Purpose of Silence: Let your students or children know why you’re using pauses. You can say, “I’m going to be quiet for a moment to give everyone some thinking time.” This frames silence as a useful tool, not an awkward void.
3. Empathetic Listening
Empathetic listening takes active listening a step further by focusing on understanding the emotional experience behind the speaker’s words. It is not just about hearing the message but about connecting with the feelings and perspective of the speaker. This powerful technique requires the listener to set aside their own viewpoint and try to see the world through the speaker’s eyes, validating their emotional state without judgment or immediate problem-solving.
This method, supported by the work of researchers like Daniel Goleman and Brené Brown, is a cornerstone of emotional intelligence. It transforms conversations from transactional exchanges into opportunities for deep human connection. As an active listening activity, it is crucial for building trust, de-escalating conflict, and creating an emotionally safe environment where individuals feel seen and understood.
How to Use Empathetic Listening
Start by tuning into the speaker’s non-verbal cues, such as tone of voice, facial expressions, and body language. When they pause, respond by acknowledging the emotion you perceive, showing that you are connecting with their feelings, not just their words.
Key Insight: The goal is to connect with the feeling, not necessarily to agree with the facts. Phrases like “That must have been so difficult,” or “I can see why you’d feel that way,” validate the emotion without taking a side.
Classroom Example:
Student: (Slams book on the desk) “This is stupid! I can’t do this math problem, and everyone else is already finished.”
Teacher: “I see you’re really frustrated right now. It can feel discouraging when it seems like others are moving ahead. Let’s look at this together.”
Home Example:
Child: “Nobody played with me at recess today. I just sat by myself the whole time.”
Parent: “Oh, that sounds incredibly lonely and sad. It must have been hard to sit by yourself while everyone else was playing.”
Tips for Effective Implementation
To make empathetic listening a successful practice in your classroom or home, focus on these key actions:
Name the Emotion: Observe the speaker’s expressions and tone, and gently name the feeling you see. “You sound really excited,” or “It looks like you’re feeling disappointed.”
Ask Feeling-Focused Questions: Use open-ended questions that invite emotional sharing, such as, “How did that make you feel?” or “What was that experience like for you?”
Use Validating Statements: Simple phrases like, “That makes sense,” or “It’s understandable that you feel hurt,” show you accept their feelings as valid.
Avoid “Fixing” It Immediately: Resist the urge to jump in with solutions or silver linings (“toxic positivity”). Sometimes, the most helpful response is to simply sit with someone in their difficult emotion, allowing them the space to feel it.
4. Clarifying Questions Technique
The clarifying questions technique is a powerful active listening activity that trains listeners to ask thoughtful, open-ended questions. Instead of making assumptions or jumping to solutions, this method encourages curiosity to deepen understanding. Asking questions like, “Can you tell me more about that?” demonstrates genuine interest while ensuring the listener fully comprehends the speaker’s experience before offering advice or judgment.
This approach, informed by the work of Edgar Schein’s Humble Inquiry and frameworks from the Crucial Learning Institute, shifts conversations from reactive to reflective. It prevents listeners from filling in gaps with their own biases and empowers the speaker to explore their thoughts more deeply. As an SEL tool, it fosters perspective-taking, critical thinking, and mutual respect in any dialogue.
How to Use Clarifying Questions
Listen with the intent to understand, not just to respond. When the speaker pauses, ask an open-ended question that invites them to share more detail. This active listening activity slows down the conversation and prioritizes comprehension over quick fixes.
Key Insight: The goal is to avoid yes/no questions that shut down conversation. Instead, use questions that begin with “What” or “How” to encourage the speaker to elaborate on their thoughts, feelings, and experiences.
Classroom Example:
Student: “I’m not playing with Leo anymore. He’s so mean.”
Teacher: “It sounds like something happened that was upsetting. What happened that made you feel he was being mean?”
Home Example:
Child: “My teacher gave me a bad grade on my project, and it’s not fair!”
Parent: “I hear that you feel the grade wasn’t fair. Can you tell me more about the project and what part felt unfair to you?”
Tips for Effective Implementation
To make clarifying questions a successful active listening activity, concentrate on these practical steps:
Start Questions Thoughtfully: Begin your questions with “What,” “How,” or “Tell me more about…” to invite detailed responses. Avoid “Why” questions, which can sound accusatory (“Why did you do that?”).
Ask One Question at a Time: Overloading the speaker with multiple questions can be confusing. Ask a single, focused question and wait for a full response before considering your next one.
Listen to the Answer: The purpose of the question is to gain understanding. Pay close attention to the response rather than just planning your next question.
Slow Down Your Impulses: Use this technique to manage your own reactive tendencies. Asking a clarifying question gives you time to process the situation before offering a solution or judgment. For more ideas on building this skill, check out this guide on communication skills activities.
5. Body Language and Non-Verbal Awareness
Body Language and Non-Verbal Awareness is an active listening activity that shifts the focus from words to what is communicated through physical cues. This practice involves consciously observing and using eye contact, posture, facial expressions, and gestures to show attention and understanding. Given that research suggests a huge portion of communication is non-verbal, mastering this skill is essential for showing someone you are truly present and engaged.
This focus on non-verbal signals, highlighted by researchers like Albert Mehrabian and Amy Cuddy, is critical for building psychological safety. When a listener’s body language aligns with their verbal message of support, it makes the speaker feel more secure and validated. This skill is foundational for Social and Emotional Learning (SEL), as it helps students accurately interpret social cues and build stronger, more empathetic connections. Learning how to read and use body language is a powerful tool for effective communication.
How to Use Body Language and Non-Verbal Awareness
Pay close attention to your own physical signals while another person is speaking. The goal is to make your body reflect your intention to listen carefully and respectfully.
Key Insight: Your body speaks volumes before you even say a word. An open, attentive posture can make a speaker feel safe and encouraged, while distracted or closed-off body language can shut a conversation down.
Classroom Example:
Situation: A student is shyly sharing a personal story with the class.
Teacher: The teacher sits at the front of the room, leans forward slightly, maintains a soft and encouraging facial expression, and nods periodically to show they are following along. They keep their hands relaxed and visible, avoiding crossed arms.
Home Example:
Child: “I messed up my drawing and I have to start all over again!”
Parent: The parent puts their phone down, kneels to be at the child’s eye level, and uses a concerned expression. They might say, “Oh no,” while gently touching the child’s shoulder to offer comfort before saying anything else.
Tips for Effective Implementation
To make body language a successful active listening activity, concentrate on these intentional actions:
Position for Connection: Whenever possible, position yourself at the speaker’s eye level. This simple adjustment reduces perceived power dynamics and fosters a feeling of equality.
Mirror an Open Posture: Avoid crossing your arms, which can signal defensiveness. Instead, keep your posture open and lean in slightly to convey interest.
Use Mindful Gestures: Nodding shows you are following along, but do it naturally. Your facial expressions should reflect the emotional tone of the speaker’s message, showing empathy.
Eliminate Distractions: Put away your phone, turn away from your computer screen, and give the speaker your full physical presence. This is one of the clearest non-verbal signs that you are listening. Teaching children about reading social cues is a related skill that reinforces this practice.
6. Active Listening Circles (Talking Piece Protocol)
Active listening circles, also known as the talking piece protocol, are structured group activities where participants take turns speaking without interruption. While sitting in a circle, a designated object (the “talking piece”) is passed from person to person, and only the individual holding the piece is allowed to speak. This ancient practice, with roots in Indigenous peacemaking traditions, fosters equitable participation and teaches students to listen deeply to all voices, not just those they usually agree with.
This method is a powerful active listening activity because it slows down conversation and creates a safe, predictable space for sharing. By ensuring every student gets an uninterrupted turn, it helps build a strong classroom community, elevates quieter voices, and provides a structured format for addressing group challenges. It is a core component of restorative practices in schools, promoting empathy and collective problem-solving.
How to Use Active Listening Circles
Gather your group in a circle where everyone can see each other. Introduce the talking piece and explain the three core rules: only the person holding the piece may speak, everyone else listens respectfully, and you have the right to pass if you don’t wish to share.
Key Insight: The circle’s power comes from its structure. The talking piece isn’t just a tool to manage turns; it’s a symbol of respect for each person’s voice and a physical reminder for others to focus on listening.
Classroom Example:
Topic: “Share one ‘high’ and one ‘low’ from your weekend.”
Teacher: (Holding a small decorated stone) “I’ll start. My high was seeing a beautiful sunset on my walk, and my low was spilling coffee on my favorite shirt. I’ll now pass the talking piece to my left. Remember, you can pass if you’d like.” The stone is then passed to the next student, who shares while all others listen.
Home Example:
Topic: “What’s one thing our family could do to be kinder to each other this week?”
Parent: (Holding a favorite seashell) “I think we could all put our phones away during dinner so we can connect more. I’m passing this to you now. What are your thoughts?” The shell is passed to a child, who is given the floor to speak without being interrupted.
Tips for Effective Implementation
To ensure your listening circle is a successful active listening activity, pay attention to the setup and facilitation:
Start with Low Stakes: Begin with simple, fun topics like “favorite superpower” or “what made you smile today” to build comfort and familiarity with the process.
Set Time Guidelines: For larger groups, suggest a gentle time limit (e.g., 1-2 minutes per person) to ensure everyone gets a turn and the activity stays focused.
Establish the Right to Pass: Explicitly state that anyone can pass their turn without giving a reason. This creates psychological safety and removes pressure.
Debrief the Process: After the circle, ask students reflective questions: “What did you notice about your listening when you couldn’t interrupt?” or “How did it feel to share without being cut off?”
7. Empathy Mapping and Perspective-Taking
Empathy mapping is a structured exercise where listeners visualize another person’s experience by considering what they see, hear, think, feel, say, and do. This technique moves beyond surface-level listening to a deeper understanding of someone’s internal world. It makes empathy tangible by asking us to step into another person’s shoes and consider their reality from multiple angles.
Popularized by innovators like Dave Gray and supported by the empathy research of Brené Brown, this powerful active listening activity helps students and adults alike move from sympathy (“I feel sorry for you”) to empathy (“I can understand what you’re feeling”). It builds a crucial foundation for conflict resolution, peer support, and creating an inclusive community.
How to Use Empathy Mapping
The core of this activity is filling out a four-quadrant map (or six, in some versions) focused on another person’s experience. This can be done individually or in groups after listening to someone’s story or reading about a character.
Key Insight: The goal is to separate observation from inference. By mapping what someone says and does versus what they might think and feel, participants learn to look beyond outward behavior to understand underlying motivations and emotions.
Classroom Example:
Scenario: A student is withdrawn and snaps at classmates who try to talk to them. The teacher leads the class in creating an empathy map to understand the student’s perspective without judgment.
Teacher: “Let’s think about what our classmate might be experiencing. What might they be thinking when they’re alone? What could they be feeling that makes them seem angry?” This shifts the focus from blame to understanding.
Home Example:
Scenario: A child is struggling to understand why their friend is ignoring them.
Parent: “Let’s make a map for your friend. What do you think they saw or heard that might have upset them? What might they be thinking about right now, even if they aren’t saying it?”
Tips for Effective Implementation
To make empathy mapping a successful active listening activity, consider these practical steps:
Start with Fictional Characters: Begin with characters from books or historical figures. This provides a safe, low-stakes way to practice before applying the skill to real-life peer conflicts.
Use Visuals: Draw the map on a whiteboard or large paper. Using different colors for each quadrant and allowing for drawings makes the process more engaging for visual learners.
Ask Guiding Questions: Prompt deeper thought with questions like, “What challenges might they be facing that we can’t see?” or “What worries might be keeping them up at night?”
Connect to Real Listening: Combine empathy mapping with real conversations. After a student shares a problem, have the listeners create a map to check their understanding. You can find more ideas in these perspective-taking activities.
8. Peer Tutoring and Teach-Back Method
The teach-back method is an active listening activity where the listener demonstrates understanding by explaining what they heard back to the speaker or to another person. It shifts listening from a passive act to an active one, requiring the listener to process, synthesize, and articulate information. When used for peer tutoring, this technique creates a powerful learning cycle that benefits both students. The “teacher” deepens their own comprehension, while the “learner” receives confirmation that their message was accurately received.
This method, with theoretical support from Vygotsky’s work on peer learning and Spencer Kagan’s cooperative learning structures, is highly effective in K-8 settings. It turns listening into a tangible and accountable skill, strengthening both academic retention and social-emotional competencies like empathy and clear communication.
How to Use the Teach-Back Method
The core idea is simple: after one person speaks or explains something, the other person’s job is to “teach it back” in their own words. This can be done in pairs, small groups, or even as a whole-class check for understanding.
Key Insight: The focus is on demonstrating comprehension, not on perfect recitation. The goal is to prove you listened well enough to explain the main idea, which is a much higher-level skill than simply remembering words.
Classroom Example:
Context: After a mini-lesson on the water cycle, the teacher puts students in pairs.
Teacher: “Turn to your partner. Partner A, you have one minute to explain the process of evaporation. Partner B, your job is to listen carefully.”
After 1 minute: “Okay, now Partner B, teach back to Partner A what you heard them say about evaporation. Start with, ‘What I heard you say was…'”
Home Example:
Context: A child is explaining the complicated rules of a new video game they want to play.
Child: “First you have to collect three power crystals, but you can’t get the red one until you beat the mini-boss in the forest, and he’s weak to ice attacks…”
Parent: “Okay, let me see if I’ve got this. So the first step is to find three power crystals. To get the red crystal, I have to go to the forest and defeat a specific enemy using an ice attack. Did I understand that correctly?”
Tips for Effective Implementation
To make the teach-back method a successful active listening activity, consider these practical steps:
Use Sentence Stems: Provide students with sentence starters to reduce anxiety and structure their responses. Phrases like, “My partner shared that…” or “What I understood was…” are great scaffolds.
Normalize Mistakes: Frame teach-back errors as learning opportunities, not failures. If a student misinterprets something, the original speaker can clarify, strengthening both of their skills.
Start Small: Begin with paired teach-backs before asking students to share with the whole class. This builds confidence in a lower-stakes environment.
Create Strategic Pairings: Pair students thoughtfully. Sometimes pairing a stronger student with one who needs support is beneficial, while other times, pairing students of similar abilities can foster a sense of shared discovery.
Celebrate Good Listening: When you see a student effectively teach back what their partner said, praise their listening skills explicitly. Say, “That was excellent listening. You really understood what she was explaining.”
Comparison of 8 Active Listening Activities
Technique
Implementation complexity
Resource requirements
Expected outcomes
Ideal use cases
Key advantages
Reflective Listening (Paraphrasing)
Low–Moderate; practice to sound natural
Minimal; brief training and practice time
Fewer misunderstandings; increased trust and clarity
Immediate feedback, deepens learning, builds confidence and accountability
Putting It All Together: Creating a Culture of Listening
The journey from a noisy classroom to a community of engaged listeners is built one interaction at a time. The activities outlined in this article, from Reflective Listening to the Peer Tutoring and Teach-Back Method, are more than just isolated exercises. They are the essential building blocks for creating a culture where feeling heard is the norm, not the exception. Integrating even one new active listening activity per week can begin to shift the dynamic in your classroom or home, fostering deeper connections and a stronger sense of belonging.
The true power of these techniques lies in their cumulative effect. When a child learns to paraphrase a peer’s feelings in an Active Listening Circle, they are not just completing a task; they are practicing the empathy needed to resolve a future conflict on the playground. When a student uses clarifying questions during a peer tutoring session, they are developing the critical thinking skills required to understand complex academic material and diverse perspectives. These are not soft skills; they are foundational life skills that directly support academic achievement and emotional well-being.
From Individual Activities to Daily Habits
To make listening a core value, it’s crucial to move beyond scheduled activities and weave these practices into the fabric of daily life. The goal is to create a shared language and a set of common expectations around communication.
Model the Behavior: The most powerful tool you have is your own example. When a child is upset, get down on their level, use Silent Listening to give them space, and then paraphrase what you heard: “It sounds like you felt really frustrated when your tower fell down.” This demonstrates respect and shows them what empathetic listening looks like in action.
Create Visual Reminders: Post anchor charts with sentence stems for clarifying questions (“Can you tell me more about…?”) or paraphrasing (“So, what you’re saying is…”). These visual cues support students, especially younger ones, as they internalize these new habits.
Celebrate the Effort: Acknowledge and praise students when you see them actively listening. A simple comment like, “Michael, I noticed you were looking right at Sarah while she was speaking and waited for her to finish. That was great listening,” reinforces the desired behavior far more effectively than correcting poor listening.
The Long-Term Impact of True Listening
Implementing a consistent active listening activity program does more than just quiet a room. It equips children with the tools to navigate a complex world with compassion and confidence. Students who feel heard are more likely to engage in learning, take healthy risks, and see themselves as valued members of a community. They learn that their voice matters and, just as importantly, that the voices of others matter, too.
A classroom culture rooted in active listening becomes a place where curiosity thrives over judgment, and connection is valued over correctness. Children learn that understanding someone is a more powerful goal than simply winning an argument.
By prioritizing these skills, you are making a direct investment in preventing bullying, reducing classroom conflicts, and building the social-emotional resilience every child needs to succeed. You are teaching them how to build and maintain healthy relationships, a skill that will serve them throughout their academic careers and far into adulthood. The quiet confidence that comes from knowing how to truly listen and be heard is one of the greatest gifts you can give a child.
Ready to take the next step and bring a comprehensive, school-wide listening culture to your community? Soul Shoppe provides dynamic programs and proven strategies that empower students with the social-emotional tools they need to thrive, with a core focus on the power of an active listening activity. Visit Soul Shoppe to see how their on-site and virtual programs can help you build a safer, more connected school environment.
“I-statements” are a simple but incredibly effective communication tool that helps kids voice their feelings without pointing fingers. Think about the difference between a child saying, “You made me mad,” versus, “I feel mad when you take my toy.” That tiny shift is a cornerstone of social-emotional learning, empowering kids to own their feelings and start a conversation instead of a fight.
The Power of ‘I Feel’ Over ‘You Did’
When a child feels hurt or wronged, the first instinct is often to blame. You’ll hear phrases like “You’re so mean!” or “You always ruin everything!” While these words definitely get the frustration across, they also immediately put the other person on the defensive. Conflict escalates, and resolution feels impossible.
This is where teaching I-statements becomes a total game-changer.
The whole idea is to switch from accusation to expression. By starting with “I feel,” a child is sharing their internal experience—something that’s undeniably true for them—rather than passing judgment on someone else. This simple change helps build several key skills:
Builds Self-Awareness: It forces a pause, helping kids identify what they’re actually feeling before they react.
Promotes Empathy: When a friend hears how their actions made someone else feel, it offers a window into another person’s perspective.
De-escalates Conflict: It’s a lot harder to argue with “I feel sad” than it is with “You’re a bad friend.”
Encourages Responsibility: Kids learn to take ownership of their emotions instead of making others responsible for how they feel.
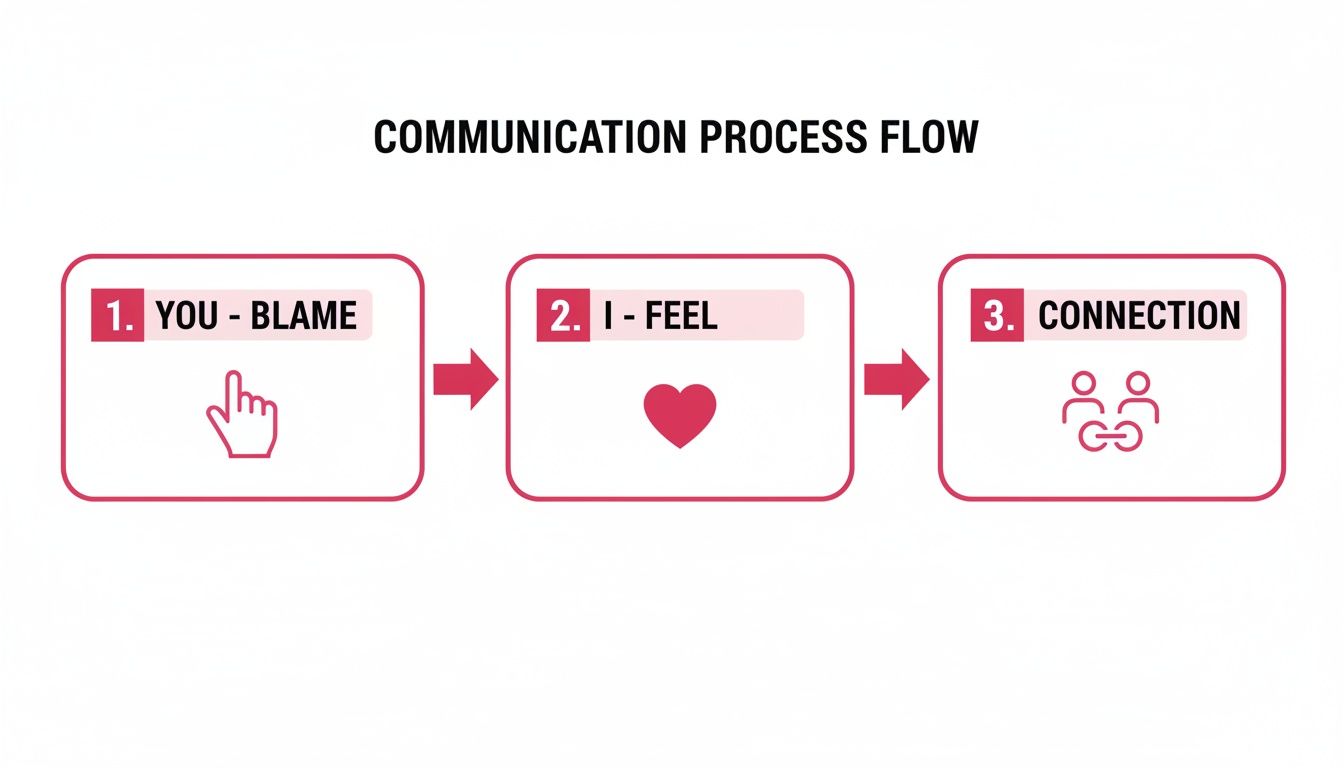
From ‘You-Blame’ to ‘I-Feel’ Statements
Let’s look at how this shift works in real-world kid conflicts. It’s often easier to see the difference side-by-side. The goal is to move from an attack that shuts down communication to an invitation that opens it up.
Common Conflict
Problematic ‘You Statement’
Empowering ‘I Statement’
Being Left Out
“You never let me play with you!”
“I feel sad when I’m left out of the game.”
Sharing Toys
“You’re so selfish for not sharing!”
“I feel frustrated when I can’t have a turn.”
Unkind Words
“You’re being mean to me.”
“I feel hurt when you say things like that.”
Broken Promises
“You always break your promises!”
“I feel disappointed when you don’t do what you said you would.”
Seeing these examples makes it clear how “I-statements” can completely change the tone of a disagreement, turning a potential fight into a moment for understanding.
A Foundational Skill for Life
This isn’t just some clever script to memorize; it’s a core component of healthy relationships and emotional intelligence. Picture a classroom where a student can confidently say, “I feel sad when I’m not included in the game,” instead of shoving another child or withdrawing in silence. That’s the power of I-statements in action.
Research backs this up. Social-emotional learning (SEL) programs, which lean heavily on tools like this, have been shown to significantly improve student outcomes. In fact, schools with strong SEL curricula can see a reduction in disruptive behaviors by up to 20-30%, creating a more positive and collaborative learning environment.
By teaching children to speak from their own experience, we give them a tool to navigate disagreements constructively. It transforms a potential fight into an opportunity for connection and understanding.
From the Playground to the Boardroom
Mastering this skill early really does set kids up for future success. Knowing how to express yourself clearly and respectfully is fundamental to effective communication and builds broader diplomacy skills for students. This approach teaches kids that their feelings are valid and gives them a constructive way to share them, which in turn builds confidence and resilience. It’s a skill that will serve them on the playground, in the classroom, and one day, in their adult relationships and careers.
Ultimately, weaving I-statements into daily language helps create an environment where kids feel heard and respected. This small linguistic shift makes a massive impact, paving the way for more peaceful and effective communication.
If you’re looking for more ways to help children resolve disagreements, check out our guide on conflict resolution for kids.
The Four-Part Formula for Effective I-Statements
Think of a good I-statement like a recipe. When you add all the right ingredients in the right order, you get a much better result. We can break down powerful I-statements for kids into a simple, four-part formula that takes the guesswork out of clear communication.
This structure helps kids organize their thoughts and express themselves without falling back on blame, which almost always shuts down a conversation. It’s about shifting communication from accusation to connection.
This visual shows exactly that—the shift from a “You-Blame” approach that creates conflict to an “I-Feel” approach that opens the door for understanding.
By focusing on personal feelings (“I”) instead of accusations (“You”), children invite empathy and problem-solving rather than making the other person defensive.
Part 1: Start with Your Feeling
The first step is simply to name the emotion. It sounds easy, but it requires a child to hit the pause button and figure out what’s really going on inside. Our goal is to help kids build a rich emotional vocabulary that goes way beyond just “mad,” “sad,” or “happy.”
For instance, instead of just “mad,” a child might feel frustrated, annoyed, or irritated. Instead of “sad,” they might be feeling lonely, disappointed, or hurt.
Practical Example: “I feel frustrated…”
Practical Example: “I feel lonely…”
Practical Example: “I feel annoyed…”
Using more specific words gives the other person a much clearer picture of the situation’s emotional weight. You can find more ideas for helping kids name their feelings in our other communication skill activities.
Part 2: Describe the Specific Behavior
This is probably the most crucial—and toughest—part of the formula. The key is to state the observable action that triggered the feeling, not a judgment or assumption about why the other person did it.
Think of it like being a video camera recording exactly what happened. A camera sees someone talking while another person is speaking; it doesn’t see someone “being rude.”
Avoid Judgment: “when you are mean.”
Stick to Facts (Practical Example): “when you call me a name.”
Avoid Generalizations: “when you never share.”
Stick to Facts (Practical Example): “when you don’t offer me a turn with the controller.”
Avoid Assumptions: “when you ignore me on purpose.”
Stick to Facts (Practical Example): “when you walk away while I’m talking.”
Sticking to a specific, observable behavior keeps the listener from feeling attacked and focuses the conversation on a single, solvable action.
Part 3: Explain the Impact on You
The “because” part of the statement is where the magic happens—it’s where empathy is built. This piece explains why the behavior led to the feeling, connecting the action to its consequence. It helps the other person understand the reasoning behind the emotion.
This step essentially answers the silent “So what?” that can hang in the air after someone states a feeling. It makes an abstract emotion feel concrete and real.
Key Takeaway: The ‘because’ clause is the bridge to understanding. It helps the other person see the situation from your child’s perspective, making it more likely they will want to help find a solution.
Let’s build on our earlier examples with practical scenarios:
Practical Example: “I feel frustrated when you don’t offer me a turn with the controller because I’ve been waiting a long time and thought we agreed to share.“
Practical Example: “I feel lonely when I’m not invited to sit at the lunch table because it makes me feel like I don’t have any friends.“
Practical Example: “I feel hurt when you call me a name because words like that stick in my head and make me feel bad about myself.“
This adds depth and a little vulnerability, inviting the other person to connect with the speaker’s experience instead of just reacting to a demand.
Part 4: Make a Positive Request
The final piece is stating what you need. This isn’t a demand. It’s a clear, positive, and actionable request for what would help fix things. The secret is to ask for what you want, not just for what you want to stop.
Framing the need positively is a game-changer. A negative request (“Stop doing that!”) can still sound like a criticism, while a positive one (“Could we try this instead?”) invites teamwork.
Negative Request (Avoid): “I need you to stop hogging the game.”
Positive Request (Use/Practical Example): “I need us to set a timer so we both get a fair turn.”
Negative Request (Avoid): “Stop being so mean.”
Positive Request (Use/Practical Example): “I need you to use my real name instead of calling me names.”
Here are the full, four-part statements, all put together in practical examples:
Practical Example: “I feel frustrated when you don’t offer me a turn with the controller because I’ve been waiting a long time and thought we agreed to share. I need us to set a timer for turns.”
Practical Example: “I feel lonely when I’m not invited to sit at the lunch table because it makes me feel like I don’t have any friends. I need you to save me a seat sometimes.”
Practical Example: “I feel hurt when you talk over me during my presentation because it makes me feel like my ideas aren’t important. I need to be able to finish my thoughts without being interrupted.”
This complete formula gives kids a clear, respectful, and effective roadmap for communication that empowers them to solve problems together.
Teaching I Statements with Age-Specific Scenarios
Kids’ emotional worlds and communication skills change dramatically as they grow up. The way you’d teach a four-year-old is completely different from how you’d approach a fourteen-year-old, right? That’s why teaching I statements for kids can’t be a one-size-fits-all lesson. It requires a flexible strategy that meets them right where they are, developmentally speaking.
Forget handing them a generic script to memorize. The real goal is to offer them tools that feel natural and genuinely useful for the social challenges they’re actually facing, whether that’s in the sandbox or on social media.
This age-differentiated method empowers children with language that feels relevant, making the skill less like a formula and more like a real way to express themselves.
Preschoolers: Simple and Concrete Language
At this age, emotions are HUGE, but the words to describe them are still pretty new. The goal here is to keep it simple and direct. We can introduce a shortened, two-part I-statement that clearly connects a feeling to a specific thing that happened.
For this age group, the most effective formula is straightforward: “I feel [feeling] when [action].”
To make this idea stick, bring in visual aids like feelings charts with smiley, sad, and angry faces. Puppets are another fantastic tool for acting out different situations in a playful, low-stakes way. Repetition and connecting the words to physical experiences are everything.
Practical Examples for Preschoolers:
Sharing a Toy: Instead of a child yelling, “He’s hogging the blocks!”, you can gently model: “I feel sad when you take the blue block because I was using it.”
Unwanted Physical Contact: Rather than a shove or a frustrated cry, guide them toward saying: “I feel upset when you push me because it hurts my body.”
Being Ignored: Help them find the words for that left-out feeling: “I feel lonely when you run away from me during playtime.”
Clean-up Time: Instead of “You’re messy!”, try: “I feel frustrated when the toys are left on the floor.”
With preschoolers, the adult’s role is to provide the script and patiently coach them through it. Your consistent modeling is the most powerful tool you have. If you’re looking to expand your child’s emotional vocabulary, our guide on naming feelings and helping kids find the words they need is a fantastic resource to start with.
Elementary Students: Adding ‘Because’ and ‘I Need’
By the time kids hit elementary school, they can handle more complexity. They’re starting to understand cause and effect, and they can grasp how their actions impact others. This is the perfect time to introduce the full four-part I-statement formula.
Their social worlds are also way more intricate now. Friendships, playground politics, and classroom dynamics bring a whole new set of challenges. This is where the “because” and “I need” parts of the statement become so important—they help kids not only express feelings but also start thinking about solutions.
This is where the skill shifts from simply naming an emotion to actively solving a problem. By stating a need, kids learn to advocate for themselves respectfully and invite cooperation.
Practical Scenarios for Elementary Kids:
Feeling Left Out at Recess: “I feel left out when you and Sara run off to play without asking me because it makes me think you don’t want to be my friend anymore. I need us to make a plan to play together at the start of recess.”
Frustration with a Sibling: “I feel frustrated when you come into my room and take my things without asking because then I can’t find them when I need them. I need you to ask me first.”
Hurtful Words: “I feel hurt when you make a joke about my new glasses because it makes me feel embarrassed. I need you to stop making comments about how I look.”
Group Work in Class: “I feel worried when we wait until the last minute to do our project because I’m afraid we won’t finish. I need us to make a schedule to get the work done on time.”
The value of teaching I statements at this age is backed by decades of research in Social Emotional Learning (SEL). When a 7-year-old can say, “I need space because I’m feeling overwhelmed,” they are practicing a core SEL skill that helps them own their emotions without blame. Since its formation in 1994, CASEL has embedded these concepts into core SEL components. In fact, they are present in over 70% (10 of 14) of evidence-based elementary programs. Research shows SEL leads to academic gains of up to 11 percentile points, a 23% reduction in emotional distress, and a 9% drop in conduct problems. With 76% of U.S. schools using formal SEL in 2021-2022, this approach is clearly making an impact. You can explore the full report on SEL in U.S. schools and its impact to learn more.
Middle Schoolers: Navigating Complex Social Dynamics
Tweens and young teens are dealing with a whole new level of social pressure. Their conflicts are more nuanced, often tangled up in group dynamics, social media drama, and a huge fear of embarrassment. For this age group, I statements become a vital tool for navigating friendships and setting boundaries with integrity.
The biggest challenge is getting them to actually use the skill without it sounding robotic or “lame.” Encourage them to find their own words while sticking to the core principles: own your feelings and don’t place blame. Role-playing is incredibly powerful here, as it gives them a safe space to practice before trying it out with their peers.
Practical Scenarios for Middle Schoolers:
Social Media Drama: “I feel really stressed out when I see comments about me in the group chat because it feels like everyone is talking behind my back. I need you to talk to me directly if you have a problem.”
Group Project Frustrations: “I feel overwhelmed when I end up doing most of the work for our project because it doesn’t seem fair. I need us to sit down and divide up the remaining tasks equally.”
Responding to Peer Pressure: “I feel uncomfortable when you keep asking me to skip class because I’m worried about getting in trouble. I need you to respect my decision to say no.”
Feeling Unheard by a Friend: “I feel ignored when I’m telling you about my day and you’re on your phone the whole time because it makes me feel like you don’t care about what I’m saying. I need you to listen to me when we’re talking.”
By tailoring your approach to each stage of development, you give kids practical and relevant communication tools they can use for the rest of their lives.
Making I-Statements a Daily Habit
Learning the I-statement formula is one thing, but the real magic happens when this way of communicating becomes second nature. The goal isn’t to create a rigid script kids have to follow; it’s to weave this language into everyday moments until it becomes a genuine habit. For that to happen, consistency and adult modeling are everything.
Showing kids how it’s done is far more powerful than just telling them. When adults use I-statements to talk about their own feelings and needs, children see the tool in action. They learn that expressing emotions respectfully isn’t just for conflict resolution—it’s a normal and effective way to connect with others.
Weaving I-Statements into Home Life
At home, opportunities to model and practice I-statements pop up all the time. Sibling squabbles, chore negotiations, and setting simple boundaries are perfect moments to steer the conversation toward healthier communication. Instead of playing referee, you get to be a communication coach.
Here are a few practical ways to embed this habit in the real world:
During Sibling Disputes: When one child yells, “He won’t share!”, you can gently guide them by asking, “How does that make you feel inside? Can you try an I-statement to tell him?” A practical prompt could be: “Try saying, ‘I feel frustrated when I can’t get a turn.'”
Setting Boundaries Around Chores: Model it yourself. Instead of, “You never clean up your mess,” try something like, “I feel stressed when toys are left on the floor because it makes the room feel chaotic and hard to clean. I need us to work together to put them away before dinner.”
Dinner Table Check-ins: Make sharing feelings a low-pressure part of your routine. You could ask, “What was something today that made you feel proud?” or “Did anything happen that made you feel frustrated?”
Responding to Backtalk: Instead of “Don’t use that tone with me,” try modeling a response like: “I feel disrespected when you use that tone of voice because it makes it hard for me to listen to what you’re saying. I need you to speak to me calmly.”
By consistently prompting and modeling, you’re building emotional muscle memory. If you’re looking for more ideas on establishing positive patterns, check out our guide on creating routines that help kids feel emotionally grounded.
Creating a Culture of Respect in the Classroom
Teachers have a unique opportunity to make I-statements a core part of the classroom culture. When this language is used daily, it can dramatically reduce minor conflicts and build a much stronger sense of community. Visual reminders and dedicated practice time are key here.
Creating an “I-Statement Anchor Chart” with the four-part formula and posting it in a visible spot gives students a quick reference point. This simple visual cue can help them recall the steps when they feel overwhelmed by a big emotion.
Practical Conversation Starter Prompt: “It looks like you two are having a tough time. Can we pause and try using our I-statements to figure out what’s happening?”
This simple prompt shifts the focus from blame to understanding. It empowers students to start solving their own problems. Incorporating I-statements into morning meetings also provides a regular, low-stakes time to practice. You might present a hypothetical scenario—like someone cutting in line or borrowing a crayon without asking—and have students work in pairs to craft an I-statement for it.
The widespread adoption of these tools is part of a larger, positive shift in education. As difficult events in the late 1990s revealed emotional gaps in schools, I-statements for kids became a frontline tool in Social-Emotional Learning (SEL) curricula, teaching students to voice needs safely. After the pandemic, federal relief funds led to a huge spike in usage, with principals reporting a 29-point jump in elementary SEL implementation by 2021. Today, 86% of school leaders connect discipline with emotional growth, directly using tools like I-statements for conflict resolution. Discover more insights about the growth of SEL in U.S. schools.
Navigating Common Roadblocks and Challenges
Teaching I-statements for kids is a huge step forward, but let’s be real—communication is messy. Even with the best tools, you and your child will hit moments where things just don’t go according to plan. Being ready for these bumps in the road is what builds confidence and turns this skill into a resilient tool, not just a formula to ditch when things get tough.
So, what happens when a child flat-out refuses to use the format? Or when they do, and the other person reacts with anger or just dismisses them? Let’s walk through the most common roadblocks and get you equipped with practical advice and coaching scripts to handle them.
When Your Child Refuses to Use I-Statements
Sometimes, a child is simply too overwhelmed, angry, or upset to pause and craft a perfect I-statement. Pushing the structure in that moment can feel like you’re dismissing their feelings. Instead of demanding the “right words,” your first job is to help them regulate.
The goal here is connection over correction. Once they feel calm and connected, you can gently guide them back to the tool.
Acknowledge Their Feeling First (Practical Example): “Wow, I can see you’re absolutely furious right now. It’s okay to feel that way.”
Offer Space and a Tool (Practical Example): “Let’s take a few deep breaths together before we talk about what just happened.”
Revisit When They’re Ready (Practical Example): “When you’re feeling a little calmer, we can think about how to tell your brother how that made you feel using an I-statement.”
If you force the format when emotions are running high, you’ll only build resistance. They’ll start to see I-statements as a chore, not a tool.
When the Other Person Reacts Poorly
It can be incredibly disheartening for a child to deliver a thoughtful I-statement, only to be met with defensiveness, anger, or a complete shutdown from the other person. This is a critical moment to teach them that the goal of an I-statement isn’t to control someone else’s reaction—it’s to express their own feelings with respect and clarity.
You can give them a few follow-up phrases to help de-escalate the situation while reinforcing their own boundaries.
Practical Coaching Script: “It’s a real bummer when someone doesn’t seem to hear you. But your I-statement did its job—you spoke your truth kindly. We can’t make someone listen, but you can feel really proud of how you handled yourself.”
Here are a few practical phrases you can teach them to use when they get a negative response:
“I’m not trying to blame you, I just want to share how I’m feeling.”
“I hear that you see it differently. Can you help me understand your side of it?”
“It’s okay if we don’t agree. I just needed you to know how that affected me.”
This approach teaches resilience. It helps them understand that they are only responsible for their own words and actions, not the reactions of others.
Spotting “Weaponized” I-Statements
As kids get the hang of the format, some clever ones might try to use it to get what they want rather than to express a genuine feeling. This is what I call a “You-statement” in I-statement clothing. The real difference comes down to intent: is it about connection or control?
You might hear practical examples like these:
“I feel sad because you won’t buy me that new Lego set.”
“I feel angry when you make me do my homework.”
This is a fantastic coaching opportunity. You can help your child see the difference between a feeling caused by a boundary violation versus a feeling caused by simply not getting their way.
How to Respond (Practical Steps):
Validate the Feeling, Not the Logic: “I get it, you feel sad about the toy. It’s totally okay to feel disappointed when you don’t get something you really want.”
Gently Re-state the Boundary: “My decision not to buy the toy wasn’t to make you sad. The answer is still no for today.”
Explain the Difference: “An I-statement is a powerful tool for telling someone when their actions hurt you, like if they call you a name. It’s not for trying to change a ‘no’ into a ‘yes’.”
Common Questions About I‑Statements for Kids
Even when you have the formula down and a few examples in your back pocket, putting I‑statements for kids into practice can bring up some questions. Let’s dig into some of the most common ones that come up for parents and teachers.
At What Age Should I Start Teaching This?
You can actually start introducing the basic idea of an I‑statement surprisingly early. For kids as young as three or four, a super simple “I feel…” is the perfect entry point. The main goal here isn’t a perfectly crafted statement, but simply helping them connect a feeling word to what’s happening.
A practical example would be modeling something like, “I feel sad when you take my block.” As they get a bit older and their emotional vocabulary grows, you can start layering in the other parts, like the “because” and the “I need.”
What if the I‑Statement Does Not Work?
This is a big one. It can feel really discouraging when a child bravely uses an I‑statement and the other person just doesn’t respond well—or at all. It’s so important to teach kids that the goal isn’t always about getting what they want right away.
The real point is to express their feelings respectfully.
Success is about opening up a conversation, not winning an argument. The real win is that your child shared their feelings honestly and kindly. We can’t control how other people react, but we can always be proud of how we choose to communicate.
After a tough interaction, you can coach them with a practical script like, “I’m so proud of you for sharing how you felt. Even though it didn’t solve the problem right this second, you did a great job explaining your side.” This helps shift the definition of success from the outcome to the effort.
How Can I Get My Partner on Board?
For this to really stick, getting all the caregivers on the same page is a game-changer. Instead of framing it as another parenting “rule” to follow, try connecting it to a shared goal you both have, like raising a kind, emotionally intelligent kid.
Explain the why behind I‑statements—how they cut down on blame, build empathy, and ultimately help everyone feel more connected. But honestly, the most powerful tool is your own example. When your partner sees you using I‑statements effectively with the kids (and maybe even with them!), they’ll see the positive results for themselves. A practical example would be using one during a minor disagreement: “I feel unheard when we’re making plans and my suggestion is dismissed, because I want to feel like we’re a team. I need us to consider both options together.” That firsthand experience is often more convincing than any explanation.
Are There Times When I‑Statements Are a Bad Idea?
Yes, absolutely. I‑statements are designed for working through interpersonal conflicts, not for emergencies. When a situation involves immediate safety, you need a direct, clear command—not a conversation.
For instance, if a child is about to dash into the street, you don’t say, “I feel worried when you run toward the road because a car could hit you.” You yell, “Stop!” or “Come back here now!” Always, always prioritize safety over practicing a communication skill.
At Soul Shoppe, we’re dedicated to helping school communities cultivate empathy and connection. Our programs provide students with practical tools to navigate their emotions and build healthier relationships. Discover how our experiential approach can support your school’s social-emotional learning goals at https://www.soulshoppe.org.
In a world of constant digital noise and increasing social challenges, the ability to communicate effectively is a superpower for students. Strong communication skills are the bedrock of social-emotional learning (SEL), fostering the empathy, resilience, and psychological safety needed to thrive in school, at home, and in life. These abilities are not innate; they must be intentionally taught, modeled, and practiced. This is where targeted communication skill activities become essential tools for educators and parents alike.
This guide provides a comprehensive collection of actionable strategies designed to build these foundational competencies in K-8 students. We move beyond generic advice to offer detailed, step-by-step instructions for ten powerful activities that you can implement immediately. From active listening circles that teach students to hear and be heard, to role-playing scenarios that build empathy and perspective-taking, each entry is crafted to be practical and adaptable.
You will find a curated selection of exercises designed for diverse age groups and settings, including:
Classroom adaptations and at-home modifications.
Clear learning objectives and Social-Emotional Learning (SEL) alignment.
Practical tips for assessment and extension ideas to deepen learning.
Whether you are a K-8 teacher aiming to improve classroom dynamics, a school counselor fostering conflict resolution, or a parent seeking to strengthen family connections, this listicle offers the resources you need. These activities are designed to cultivate a culture of understanding and belonging, helping children develop the emotional intelligence to navigate a complex world, one thoughtful conversation at a time. Let’s dive into the practical exercises that transform how students connect, collaborate, and grow.
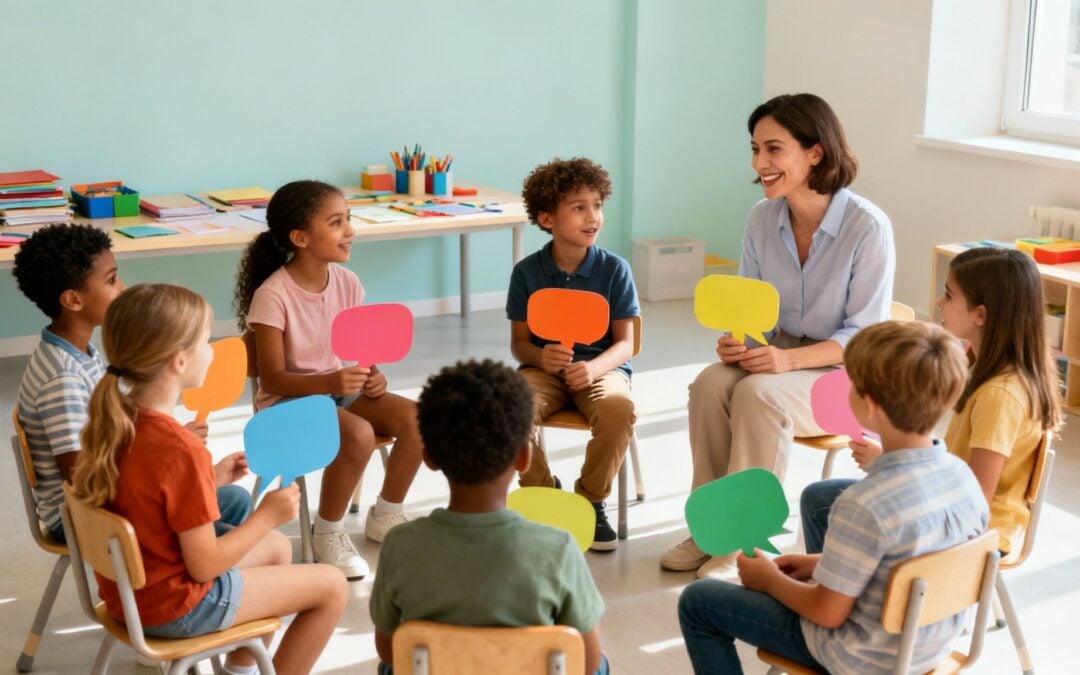
1. Active Listening Circles
Active Listening Circles are structured group sessions designed to teach participants how to listen deeply without interruption, judgment, or the pressure to formulate a response. In this foundational communication skill activity, participants sit in a circle and take turns speaking on a specific topic or prompt, often holding a “talking piece” to signify whose turn it is. While one person speaks, everyone else practices the core tenets of active listening: focusing completely on the speaker, absorbing their message, and acknowledging their perspective.
This simple yet powerful structure builds empathy, validates individual emotions, and creates a sense of psychological safety. It is a cornerstone for building a respectful and inclusive classroom or family culture where every voice is valued.
When to Use This Activity
This activity is exceptionally versatile. Use it for daily morning meetings to check in with students, as a tool for resolving classroom conflicts, or during advisory periods to discuss social-emotional learning (SEL) topics. At home, families can use this format during dinner to ensure everyone gets a chance to share about their day without being talked over. The controlled format makes it ideal for addressing sensitive subjects like bullying or social exclusion, as seen in peer support groups.
Step-by-Step Implementation
Establish Ground Rules: Before starting, co-create clear norms with the group. Key rules should include: one person speaks at a time (the one with the talking piece), listen with respect, no interruptions, and what’s shared in the circle stays in the circle.
Introduce the Talking Piece: Select an object to serve as the talking piece- a small ball, a decorative stone, or a stuffed animal works well. Explain that only the person holding this object may speak.
Provide a Prompt: Start with a low-stakes prompt, such as, “Share one good thing that happened this week,” or “What is something you are looking forward to?” For parents, a great dinner prompt is, “Share one ‘rose’ (a success) and one ‘thorn’ (a challenge) from your day.”
Model the Process: As the facilitator, go first to model the desired tone and vulnerability. For instance, a teacher might say, “My rose this week was seeing how you all helped each other with the math project.”
Facilitate the Circle: Pass the talking piece around the circle. Participants can choose to pass if they do not wish to share.
Debrief: After everyone has had a turn, lead a brief reflection. Ask questions like, “What did it feel like to be listened to?” or “What did you learn about someone else today?”
Pro-Tip: To truly master active listening, it’s essential to understand techniques like what is reflective listening, which builds trust and clarifies understanding. This involves paraphrasing what you heard to confirm you understood correctly.
This exercise is one of many effective listening skills activities that can transform group dynamics by fostering genuine connection and mutual respect.
2. Role-Playing and Perspective-Taking Scenarios
Role-Playing and Perspective-Taking Scenarios are immersive communication skill activities where participants act out realistic social situations in a safe and structured setting. By stepping into another person’s shoes, whether it’s a peer, a teacher, or a family member, students practice navigating complex interactions like resolving conflicts or standing up to bullying. This hands-on approach moves beyond theoretical discussion, allowing for practical application of empathy and assertive communication.
This method builds confidence and emotional intelligence by allowing students to experiment with different responses without real-world consequences. It is a powerful tool for developing empathy, as participants experience firsthand how their words and actions impact others’ feelings.
When to Use This Activity
This activity is ideal for teaching specific conflict resolution skills or preparing students for challenging social dynamics. Use it to address common classroom issues like exclusion at recess, disagreements during group projects, or bystander intervention in bullying situations. At home, parents can use role-playing to practice scenarios such as apologizing to a sibling or asking a friend for help. It is particularly effective in peer mediation programs and social skills groups.
Step-by-Step Implementation
Set the Stage: Clearly define the scenario and the objective. For example, a teacher might say, “In this scene, Sam has been telling other kids not to play with Alex on the playground. Our goal is to practice how a bystander could step in and help.”
Assign Roles: Assign roles such as the person being excluded, the one doing the excluding, and an active bystander. Provide simple scripts or key phrases for students who may be hesitant to improvise. For instance, the bystander’s script could start with: “Hey, I noticed Alex is standing alone. It’s more fun when we all play together. Can he join us?”
Act Out the Scenario: Give students a few minutes to act out the scene. Facilitate as needed, but allow them to lead the interaction.
Pause and Discuss: Stop the role-play at a critical moment to ask the audience and participants questions. For example, “What is Alex feeling right now? What could the bystander say to change the situation?”
Replay and Revise: Have students replay the scene, trying out a different, more positive strategy based on the discussion. Maybe this time the bystander invites Alex to a new game.
Debrief as a Group: After the role-play, lead a reflection on the experience. Discuss what strategies worked, how each character felt, and how these lessons can be applied in real life.
Pro-Tip: Increase relevance by using anonymous, real-life scenarios submitted by students. This ensures the practice is directly applicable to their daily challenges and empowers them by showing their concerns are being addressed.
Role-playing is a cornerstone of many social-emotional learning programs, like those seen in the Second Step curriculum, because it transforms abstract concepts like empathy into tangible, memorable skills.
3. Nonviolent Communication (NVC) Practice
Nonviolent Communication (NVC) is a powerful framework that teaches individuals to express themselves honestly and listen with empathy. Developed by Marshall B. Rosenberg, this approach centers on four components: observations, feelings, needs, and requests. By separating objective facts from subjective feelings and connecting them to universal human needs, NVC transforms confrontational “you” statements into collaborative “I” statements. It is one of the most transformative communication skill activities for de-escalating conflict and fostering mutual understanding.
This structured method helps reduce defensiveness, validates emotions, and paves the way for collaborative problem-solving. In a school setting, it equips students and staff with the tools to navigate disagreements constructively, moving from blame to connection. Programs like Soul Shoppe’s self-regulation workshops often integrate these principles to build a more positive school culture.
When to Use This Activity
NVC is invaluable for peer conflict resolution, classroom management, and staff communication. Use it to mediate playground disputes by helping students articulate their unmet needs (like inclusion or respect) instead of just blaming others. It’s also effective in parent-teacher conferences to address concerns without creating defensiveness. At home, families can use the NVC framework to discuss chores, screen time, or sibling rivalries in a way that makes everyone feel heard and respected.
Step-by-Step Implementation
Introduce the Four Components: Teach the four steps sequentially: Observation (state what you see without judgment), Feeling (name the emotion you are experiencing), Need (identify the universal need that is not being met), and Request (make a clear, positive, and actionable request).
Create Vocabulary Charts: Post charts in the classroom with extensive lists of “feeling” words (e.g., frustrated, lonely, excited) and “need” words (e.g., respect, safety, belonging, fun). This gives students the language to express themselves accurately.
Model with Scenarios: As a facilitator, model NVC in response to common conflicts. A parent could model: “When I see your wet towel on the floor (observation), I feel annoyed (feeling) because I need our home to be tidy and respected (need). Would you be willing to hang it up now? (request).”
Role-Play Low-Stakes Situations: Have students practice converting “blaming” statements into NVC statements. For example, turn “You always grab the ball from me!” into “When the ball was taken from my hands (observation), I felt angry (feeling) because I need to be included in the game (need). Can we take turns? (request).”
Facilitate Peer Mediation: Guide students through the four steps when a real conflict arises, acting as a coach rather than a judge.
Celebrate Success: Acknowledge and praise students when you see them using NVC language independently to solve their problems.
Pro-Tip: Start small. Practicing the four steps can feel mechanical at first. Encourage students to focus on just one part, like accurately naming their feelings, before trying to put all four components together in a high-stress moment.
The Center for Nonviolent Communication provides extensive resources for educators and parents looking to deepen their understanding and practice of this compassionate communication model.
4. Empathy Building Through Storytelling and Sharing
Empathy Building Through Storytelling and Sharing involves structured activities where individuals share personal stories about their challenges, emotions, identities, or values. This process creates authentic connection and mutual understanding. Storytelling activates mirror neurons in the brain, deepening our ability to take on others’ perspectives and humanizing their experiences, which is a powerful tool for reducing bullying and developing emotional intelligence.
These narrative-based communication skill activities build a strong sense of belonging by transforming abstract concepts like resilience and respect into lived, relatable experiences. When a student shares a story of overcoming a fear, or a teacher shares a moment of vulnerability, it builds a foundation of trust and emotional safety for everyone.
When to Use This Activity
This approach is highly effective for building classroom community at the beginning of the school year or repairing relationships after a conflict. Use it during advisory periods to explore themes of identity and belonging, or as part of a staff professional development session to foster empathy among colleagues. At home, families can use storytelling during dedicated family nights to share stories of resilience or family history, strengthening bonds across generations. It’s also a core component of assemblies like Soul Shoppe’s Peaceful Warriors Summit, which uses personal narratives to inspire large groups.
Step-by-Step Implementation
Set Supportive Ground Rules: Co-create norms focused on safety and respect. Include rules like “Listen with your heart,” “Honor each other’s stories,” and “What’s shared here stays here” to establish confidentiality.
Model Vulnerability: As the facilitator, share a brief, relevant personal story first. A parent could start with, “A time I felt really nervous was my first day at a new job, just like some of you might feel on the first day of school.”
Provide a Clear Prompt: Offer a focused prompt or sentence starter to guide the sharing. A great prompt for teachers is, “Share about a time you received help from someone and how it made you feel.” This focuses on positive social behavior.
Offer Multiple Formats: Acknowledge that not everyone is comfortable with verbal sharing. Allow participants to write, draw, or create a short digital story as an alternative. For example, students could draw a comic strip of a time they felt brave.
Manage Time: Keep stories to a 3-5 minute limit to ensure everyone who wants to share has a chance. Use a gentle timer if needed.
Connect and Reflect: After sharing, guide a brief discussion to connect the stories to broader themes like courage, growth, or community. Ask, “What common feelings or experiences did you notice in our stories today?”
Pro-Tip: The goal is connection, not performance. Emphasize that there is no “right” way to tell a story. Dignity is key, so always allow participants to pass or simply listen if they are not ready to share.
This activity is a cornerstone for anyone looking to foster deeper connections, as learning how to teach empathy often begins with the simple, profound act of sharing and receiving stories.
5. Peer Mediation and Conflict Resolution Training
Peer Mediation and Conflict Resolution Training is a structured program that empowers selected students to act as a neutral third-party mediators, helping their peers resolve disputes constructively. Mediators are trained in essential communication skills, including active listening, identifying underlying needs (interest-based negotiation), and facilitating respectful dialogue. This initiative not only addresses conflicts but also builds student leadership and fosters a more empathetic and responsible school culture.
By teaching students to manage their own conflicts, this approach reduces reliance on adult intervention and equips them with lifelong problem-solving abilities. Programs like school-wide peer mediation centers or student-led restorative circles transform the school environment, making it a place where disagreements are seen as opportunities for growth.
When to Use This Activity
This program is ideal for schools looking to proactively address common conflicts that arise during recess, in hallways, or online. It is particularly effective for low-level disputes such as rumors, social exclusion, or disagreements over property before they escalate. It serves as a Tier 1 or Tier 2 intervention, providing a structured, supportive process for students to find their own solutions. Peer mediation is also a powerful tool for building a positive school climate and reinforcing social-emotional learning competencies.
Step-by-Step Implementation
Select and Train Mediators: Choose a diverse group of students who reflect the school population and possess qualities like empathy and discretion. Provide comprehensive training using clear, repeatable protocols and role-playing scenarios.
Establish the Process: Create a clear, confidential referral and intake process. For example, a student can fill out a “conflict slip” and put it in a box in the counselor’s office. Designate a quiet, neutral space for mediation sessions.
Define the Ground Rules: Mediators begin each session by establishing rules with the participants, such as taking turns speaking, listening respectfully, and working toward a solution.
Facilitate a Structured Dialogue: The mediator guides the conversation, allowing each person to share their perspective without interruption. For example, the mediator would say, “First, Maria will share her side. Juan, your job is to listen. Then you will have a turn.” They help identify the core issues and brainstorm mutually agreeable solutions.
Formalize the Agreement: Once a solution is reached, the mediator helps the students write it down in a simple agreement that both parties sign. For a conflict over a ball, the agreement might be, “We agree to take 10-minute turns with the soccer ball at recess.”
Provide Ongoing Support: Regularly meet with peer mediators to debrief, provide guidance, and celebrate their contributions. Train staff on how and when to refer students to mediation.
Pro-Tip: The success of a peer mediation program hinges on its structure and the mediator’s ability to remain neutral. Focus training on asking open-ended questions and avoiding taking sides, which empowers students to create their own resolutions.
This program is a prime example of a proactive communication skill activity that builds a more peaceful community. Exploring various conflict resolution strategies for kids can further enhance the tools available to both mediators and the wider student body.
6. Mindful Communication and Pause Practices
Mindful Communication and Pause Practices teach students how to intentionally stop, breathe, and choose a thoughtful response instead of making an impulsive reaction. This approach integrates mindfulness with communication, helping students manage their emotions during conversations and conflicts. By creating a deliberate pause, children develop greater self-awareness and self-regulation, which are essential for navigating difficult social situations with compassion and clarity.
These practices build the foundation for more empathetic and effective exchanges, reducing emotional reactivity and fostering healthier relationships. They empower students to feel in control of their words and actions, a cornerstone of social-emotional wellness and a key element in effective communication skill activities.
When to Use This Activity
This strategy is powerful for both preemptive skill-building and in-the-moment conflict resolution. Use it to start the day, helping students arrive centered and ready to learn. It is also highly effective before transitioning to potentially challenging group work or right after recess to help students reset. For families, practicing a “pause and breathe” moment before discussing a chore disagreement or a difficult report card can transform a potential argument into a productive conversation.
Step-by-Step Implementation
Introduce Core Concepts: Explain the difference between a “reaction” (quick, emotional) and a “response” (thoughtful, chosen). Use a simple analogy, like shaking a snow globe and waiting for the glitter to settle before you can see clearly.
Teach Breathing Techniques: Explicitly teach 2-3 simple breathing exercises. A teacher could lead “Take 5 Breathing,” where students trace their hand, breathing in as they trace up a finger and out as they trace down. Belly Breathing is great for home: have the child lie down with a stuffed animal on their belly and watch it rise and fall.
Establish a Cue: Create a shared verbal or non-verbal cue to signal a pause, such as saying “Let’s pause,” raising a specific hand signal, or ringing a small chime. A parent might say, “My feelings are getting big. I need a pause.”
Practice During Calm Times: Integrate these pause practices into low-stakes, calm moments in the daily routine. For example, do three deep breaths together before starting homework each day.
Model and Guide: As the adult, model using the pause practice yourself. If a student is upset, calmly say, “I see you’re frustrated. Let’s take three deep breaths together before we talk about it.”
Debrief the Experience: After a conflict is resolved using a pause, reflect with the student(s). Ask, “How did taking that pause change how you felt?” or “What did you choose to do differently after you took a breath?”
Pro-Tip: Connect the pause to self-awareness by encouraging students to ask themselves, “What do I need right now?” This question helps them identify their underlying feelings and needs, which is a critical step toward effective self-advocacy and problem-solving.
This strategy is fundamental to programs like Soul Shoppe’s self-regulation workshops, which focus on giving students tangible tools to manage their emotions and communicate peacefully.
7. Feedback and Appreciation Circles
Feedback and Appreciation Circles are structured group activities where participants practice giving and receiving specific, constructive feedback and expressions of gratitude. Using protocols like “glow and grow,” these exercises build trust, vulnerability, and a growth mindset by creating a safe space to share observations. This process reinforces positive peer relationships and strengthens psychological safety within a classroom or family.
By teaching students how to formulate and accept feedback gracefully, this communication skill activity moves beyond simple praise to foster genuine personal and academic development. It shifts the culture from one of judgment to one of mutual support and continuous improvement.
When to Use This Activity
This activity is powerful for building a collaborative environment. Use it for weekly “appreciation shares” to boost morale, at the end of a unit for “glow and grow” feedback, or during group projects to help peers refine their work. It is also an excellent tool for students to show appreciation for teachers. At home, families can use it to create a weekly ritual of acknowledging each other’s efforts and positive actions, strengthening family bonds.
Step-by-Step Implementation
Establish a Safe Space: Co-create norms focused on respect and kindness. Emphasize that feedback is about a specific behavior or action, not a person’s character.
Introduce Sentence Starters: Provide clear sentence frames to guide participants. For appreciation, a parent could use: “I really appreciated it when you cleaned up your toys without being asked.” For teacher feedback, use “One thing that went well (a glow) was how you explained fractions using pizza.” and “Next time, you could try (a grow) adding more examples.”
Start with Appreciation Only: In the beginning, focus solely on appreciation circles. This builds comfort and trust before introducing constructive feedback. A fun home activity is an “appreciation jar” where family members write notes to each other all week.
Model the Process: As the facilitator, go first. Give a specific example of appreciation, like, “I appreciate when Maya helped a classmate who dropped their books without being asked.” Then, model receiving feedback gracefully by saying, “Thank you for that feedback.”
Facilitate the Circle: Go around the circle, giving each person a chance to share one piece of appreciation or feedback for another member. Keep comments brief and focused.
Debrief and Reflect: Conclude by asking, “How did it feel to give appreciation?” or “How can we use this feedback to help us grow?”
Pro-Tip: Teach students the difference between vague praise (“Good job!”) and specific, observable feedback (“I noticed you used three strong verbs in your opening sentence, which made it very engaging.”). Specificity makes the feedback more meaningful and actionable.
This practice is essential for developing a growth mindset and is a key component of many effective social-emotional learning programs that prioritize building positive peer relationships.
8. Communication Skills Games and Cooperative Activities
Communication Skills Games and Cooperative Activities use play-based learning to teach teamwork, collaboration, and mutual respect. These engaging activities transform abstract concepts like clarity, perspective-taking, and interdependence into tangible, memorable experiences. By embedding communication lessons within fun challenges, students learn to listen, express themselves clearly, and work together in a low-pressure, supportive environment.
This approach is powerful because it makes skill-building enjoyable and organic. Games like a silent scavenger hunt or a blindfolded partner walk require participants to rely entirely on nonverbal cues and trust, naturally strengthening their communication abilities without feeling like a formal lesson.
When to Use This Activity
These activities are perfect as classroom energizers, to kick off a new group project, or as a core part of a team-building day. Use them to break the ice at the beginning of the school year or to mend group dynamics after a conflict. At home, cooperative games can be a fantastic way for siblings to practice collaboration and problem-solving during family game night, turning potential arguments into opportunities for teamwork.
Step-by-Step Implementation
Select an Appropriate Game: Choose an activity that matches your group’s age and goals. A great classroom game is “Minefield,” where one student is blindfolded and their partner must give them verbal directions to navigate an “obstacle course” of pillows or cones. For home, try “Team Story,” where each family member adds one sentence to a story.
Explain the Rules Clearly: Before starting, clearly state the objective and rules. Emphasize that the goal is cooperation, not competition. For a blindfolded walk, for example, stress the importance of clear, calm directions.
Facilitate the Activity: Observe the group as they play. Take note of communication patterns, both effective and ineffective, to discuss during the debrief.
Lead a Debrief Session: After the game, guide a reflection. Ask questions like, “What kind of directions were most helpful in Minefield? Short ones or long ones?” “What was challenging about working together?” or “What would you do differently next time?”
Connect to Real-Life Situations: Help students connect the lessons from the game to real-world scenarios, such as working on a group project or solving a disagreement with a friend.
Pro-Tip: To maximize learning, adapt traditionally competitive games into cooperative ones. For instance, instead of having teams race to build the tallest tower, challenge the entire group to build one stable tower together. This shifts the focus from winning to collective success.
Organizations like Soul Shoppe have perfected the use of interactive games in their workshops to build these essential skills, demonstrating how play is a powerful pathway to better communication.
9. Assertive Communication and Boundary-Setting Practice
Assertive Communication and Boundary-Setting Practice is a structured training activity that teaches students how to express their needs, opinions, and boundaries clearly and respectfully. Unlike aggressive communication (hostile) or passive communication (compliant), assertiveness is about confident self-expression while respecting others. Through role-playing, scripting, and guided practice, students learn the verbal and non-verbal skills needed to stand up for themselves and others, which is foundational for building healthy relationships and preventing bullying.
This activity directly equips students with tools to navigate peer pressure, ask for help, and address conflict constructively. By normalizing and practicing boundary-setting, it cultivates a classroom culture where respect and self-advocacy are core values.
When to Use This Activity
This is an essential activity for social-emotional learning (SEL) lessons, bullying prevention programs, and health classes. Use it to address specific classroom dynamics where students struggle to speak up or resolve conflicts. It is also highly effective in one-on-one counseling sessions to help a student who is either overly passive or aggressive. At home, families can use these techniques to practice respectful disagreement and establish clear personal boundaries. For guidance on specific techniques, a helpful resource is ‘A Parent’s Guide to teaching kids how to be assertive‘.
Step-by-Step Implementation
Define Communication Styles: Begin by clearly defining and providing examples of passive, aggressive, and assertive communication. For example, a teacher could act out three ways to ask for a pencil: passively (whispering, looking down), aggressively (snatching it), and assertively (making eye contact and asking calmly).
Introduce an ‘I-Statement’ Formula: Teach students a simple script for assertive expression, such as: “I feel ___ when you ___ because ___. I need ___.” For example, a child could practice saying to a sibling: “I feel upset when you take my toys without asking because they might get lost. I need you to ask me first.”
Model and Role-Play Scenarios: Present common scenarios like a friend asking to copy homework, someone cutting in line, or receiving an unwanted comment. First, model an assertive response. Then, have students practice in pairs, taking turns playing different roles.
Practice Body Language: Coach students on assertive non-verbal cues: maintaining steady eye contact, standing tall with relaxed shoulders, and using a calm, firm tone of voice. Practice this in front of a mirror.
Provide Feedback: As students practice, offer specific, constructive feedback. Praise their efforts and celebrate brave attempts to set boundaries, even if imperfect.
Debrief the Experience: After role-playing, discuss how it felt to be assertive versus how it might feel to be passive or aggressive in that situation. Ask, “What was challenging? What felt powerful?”
Pro-Tip: Introduce the “broken record” technique for handling persistent pressure. This involves calmly repeating a short, clear “no” statement without getting drawn into an argument. For example, “No, I can’t share my answers,” repeated as needed.
Understanding the nuances between these communication styles is key. You can explore a deeper dive into teaching assertiveness versus aggressiveness to provide students with clearer distinctions.
10. Digital Communication and Social Media Literacy
Digital Communication and Social Media Literacy involves direct instruction and practice in the norms of healthy online interaction. As students’ social lives increasingly extend into digital spaces, this essential training teaches them to apply empathy, emotional intelligence, and clear communication principles to email, social media, and messaging platforms. The goal is to equip them with the tools to navigate online environments safely, positively, and responsibly.
These lessons build a foundation for strong digital citizenship, helping prevent miscommunication, cyberbullying, and other online risks. By making these conversations a normal part of their education, we empower students to build and maintain healthy relationships both on and off-screen, making it one of the most relevant communication skill activities for today’s youth.
When to Use This Activity
Integrate these activities throughout the school year in technology classes, health lessons, or advisory periods. It’s crucial to introduce these concepts before students receive their own devices or social media accounts. Use specific events, like Safer Internet Day, as a launchpad for school-wide campaigns. At home, families should establish digital communication guidelines when a child first gets a phone or tablet, creating an open dialogue about online behavior from the start.
Step-by-Step Implementation
Establish a Baseline: Start with a discussion or anonymous survey to understand students’ current digital habits, challenges, and knowledge.
Teach Netiquette: Explicitly teach the “rules” of online communication. For example, create a T-chart comparing a formal email to a teacher (clear subject, greeting, closing) with a casual text to a friend. Discuss how ALL CAPS can feel like yelling.
Introduce the “Pause Before You Post” Rule: Guide students to ask themselves three questions before sending or posting: Is it True? Is it Helpful? Is it Kind? This simple filter prevents impulsive and potentially harmful communication.
Role-Play Scenarios: Present students with realistic digital dilemmas. A teacher could ask, “Your friend posts a photo you don’t like of yourself. What do you do?” Discuss options like private messaging them to ask them to take it down versus leaving an angry public comment.
Analyze Real-World Examples: (With privacy in mind) use anonymized or public examples to discuss how digital communication can be misinterpreted. Show how the text “Fine, whatever” can be interpreted as angry, dismissive, or neutral.
Create a Digital Citizenship Agreement: Collaboratively create a classroom or family pledge that outlines expectations for respectful, safe, and responsible online behavior. A parent and child could co-sign an agreement about screen time limits and not sharing personal information.
Pro-Tip: Treat cyberbullying with the same gravity as in-person bullying. Ensure students know the clear steps to take if they witness or experience it, including telling a trusted adult, saving evidence, and blocking the user. A structured response plan is critical.
Building these skills prepares students for a lifetime of digital interaction, reinforcing that the core principles of respect and kindness are just as important online as they are in person.
Comparison of 10 Communication Skill Activities
Technique
Implementation complexity
Resource requirements
Expected outcomes
Ideal use cases
Key advantages
Active Listening Circles
Low–Medium — simple structure but needs skilled facilitation
Minimal materials (talking piece), trained facilitator, time for circles
Safer online behavior, reduced cyberbullying, stronger digital citizenship
Cyberbullying prevention, middle/high school, family workshops
Addresses modern communication realities; highly relevant and preventive
From Practice to Progress: Weaving Communication into Your School’s Culture
Moving from isolated lessons to a deeply ingrained culture of effective communication is the ultimate goal. The collection of communication skill activities detailed in this guide, from Active Listening Circles to Digital Communication Literacy, provides a comprehensive toolkit. However, their true power is unlocked not through a single session, but through consistent, intentional integration into the daily rhythm of your classroom, school, and home. The journey isn’t about perfection; it’s about persistent practice and creating an environment where students feel safe to learn, make mistakes, and grow.
Think of these activities as the individual threads. By weaving them together, you create a strong, supportive fabric that reinforces empathy, respect, and understanding across all interactions. A one-time role-playing scenario is helpful, but a culture that encourages daily perspective-taking transforms how students approach disagreements in the hallway or on the playground.
Synthesizing the Core Principles
The ten activities presented share a common foundation built on several key principles. Mastering these concepts is what elevates a simple exercise into a transformative learning experience.
Presence Over Performance: Activities like Mindful Communication and Pause Practices teach students that the most powerful tool they have is their ability to be present. It’s about listening to understand, not just to respond.
Empathy as a Learnable Skill: Through storytelling, role-playing, and peer mediation, students learn that empathy isn’t an innate trait but a skill that can be developed. They practice stepping into others’ shoes, which is fundamental to resolving conflict and building community.
Clarity and Kindness in Expression: Nonviolent Communication and Assertive Communication practices give students the language to express their needs and feelings without blame or aggression. This empowers them to set boundaries respectfully and advocate for themselves effectively.
Conflict as an Opportunity: The goal is not to eliminate conflict but to transform it. Peer Mediation and Conflict Resolution training reframes disagreements as opportunities for growth, understanding, and strengthening relationships.
By focusing on these underlying principles, you ensure that the skills learned in one activity are transferable to countless other situations, both in and out of the classroom.
Actionable Next Steps: Making It Stick
To avoid the “one-and-done” lesson trap, it’s crucial to build a sustainable plan. Lasting change comes from small, consistent actions repeated over time.
Start Small and Build Momentum: Don’t try to implement all ten activities at once. Choose one or two that address a specific need in your community. If lunchtime conflicts are a major issue, start with Peer Mediation training for a small group of student leaders. If classroom discussions feel one-sided, begin each day with a brief Active Listening Circle.
Model the Behavior: The most effective way to teach communication is to model it. As an educator, administrator, or parent, consciously use “I” statements, practice active listening in staff meetings or parent-teacher conferences, and openly acknowledge when you make a communication misstep. When students see adults practicing these skills, they understand their true value.
Create a Shared Language: Integrate the vocabulary from these activities into everyday conversations. For example, you might ask, “Are you listening with your whole body right now?” or “Let’s try to rephrase that as an ‘I feel’ statement.” This shared language creates cognitive shortcuts that help students apply their learning in real-time.
Key Takeaway: The goal is not to “do” communication activities but to “become” a community that communicates with intention, empathy, and respect. Consistency is the engine that drives this cultural transformation.
Ultimately, championing these communication skill activities is about more than improving classroom management or reducing bullying incidents. It is about equipping children with the essential tools they need to build meaningful relationships, collaborate effectively, and navigate an increasingly complex world. You are nurturing not just better students, but more compassionate, confident, and connected human beings who will carry these skills with them for a lifetime.
Ready to take the next step and bring a comprehensive, expert-led approach to your school’s culture? Soul Shoppe specializes in transforming school communities by providing dynamic assemblies, in-class workshops, and parent education focused on the very communication skill activities discussed here. Explore how Soul Shoppe can help you build a safer, more connected, and empathetic environment for every student.